Introduction
In Oracle APEX, updating values in a table based on user input is a core function of most applications. Whether you're modifying a customer profile, adjusting product pricing, or editing an employee record, Oracle APEX allows you to easily capture user-entered data through form controls and apply those changes directly to the underlying database. By using either a standard form page or a custom PL/SQL process, developers can update records with accuracy and efficiency while maintaining a user-friendly interface.
In Oracle APEX, updating values from controls (form items) into a database table is commonly done using a Form page that is based on a table or SQL query. The process involves binding page items to database columns and using a built-in or custom process to apply the changes when the user submits the form. This allows data to be updated securely and efficiently.
To update values from controls into a table, follow these steps:
1. Create or Use a Form Based on a Table
Navigate to the Application Builder and either create a new page using the "Form > Form on a Table with Report" option or open an existing form page.
-
Choose the table you want to update.
-
APEX will generate a form with fields corresponding to each column.
-
A Primary Key is required for APEX to locate the specific row to update.
2. Map Page Items to Table Columns
Ensure each page item (control) is mapped to the correct table column.
-
Open the form page.
-
Under the “Page Designer,” go to the "Items" section.
-
For each item, check the Source Type (e.g., "Database Column") and the Source Value or Expression (should match the column name).
3. Configure the Automated Row Processing (DML) Process
Oracle APEX includes a default “Automatic Row Processing (DML)” process on the form page.
-
Locate this process in the Processing section.
-
Set the process type to Automatic Row Processing (DML).
-
Set the Target Type to Table, and select the corresponding table.
-
Ensure the Primary Key Column and its corresponding page item are specified. This tells APEX which row to update.
-
On page submission (usually via a Submit button), this process will take the values entered in the form items and update the table row.
4. Use a Submit Button to Trigger the Update
Ensure the form page has a Submit button.
-
The button’s action should be “Submit Page”.
-
Under Processing, the DML process should be set to run on this button action.
-
You can optionally add a Branch to navigate the user after submission (e.g., back to a report page).
5. Optional: Add Validations Before Update
You can create validations on the page items to ensure only correct and complete data is updated.
-
Navigate to the Validation section.
-
Add checks like "Item is not null", pattern matching, or custom PL/SQL logic.
6. Example: Update an Employee Record
Let’s say you have a table EMPLOYEES and a form with fields P1_EMPLOYEE_ID, P1_FIRST_NAME, P1_LAST_NAME.
-
These items are mapped to the
EMPLOYEEStable columns. -
The DML process targets
EMPLOYEES, withP1_EMPLOYEE_IDas the primary key. -
When the form is submitted, the values in
P1_FIRST_NAMEandP1_LAST_NAMEare automatically used to update the corresponding database record.
7. Alternative: Manual Update Using PL/SQL
If more control is needed, you can disable the default DML process and use a custom PL/SQL process:
BEGIN
  UPDATE employees
  SET first_name = :P1_FIRST_NAME,
      last_name = :P1_LAST_NAME
  WHERE employee_id = :P1_EMPLOYEE_ID;
END;
-
Create a new PL/SQL Process, set it to run on page submission.
-
Ensure it runs only when needed, e.g., using Conditions based on a button click.
By following these steps, you ensure your Oracle APEX forms are not just displaying data but also securely updating values in the underlying tables based on user input. This makes your application interactive, functional, and robust.
Example
Updating Values from Controls into a Table in Oracle APEX Forms and Reports
Oracle APEX allows users to update database records directly from forms and reports. This tutorial covers updating values using APEX forms, interactive grids, classic reports, and PL/SQL processes.
Updating Values Using APEX Form
Forms in APEX provide a simple way to update existing records.
Step 1: Create a Form Based on a Table
In Oracle APEX, go to your application and click Create Page.
Choose Form and select Form on a Table with Report.
Select the table where data will be updated (e.g., EMPLOYEE_DATA).
Choose Primary Key Column (e.g., EMP_ID).
Click Next, then Finish.
This will generate a report and a form where users can update values.
Step 2: Add an Update Button
Open Page Designer and select the form page.
Locate the Submit Button (Apply Changes).
Under Processing, find the Automatic Row Processing (DML) process.
Ensure it is set to Update the selected record.
When users edit values in the form and click Apply Changes, the record will be updated automatically.
Updating Values Using PL/SQL Process
To manually update values using PL/SQL:
Step 1: Create a Manual Update Process
In Page Designer, go to Processing.
Click Create Process and select PL/SQL Code.
Set When Button Pressed to your update button (e.g., P1_UPDATE).
Use the following PL/SQL code:
BEGIN
UPDATE employee_data
SET emp_name = :P1_EMP_NAME,
emp_email = :P1_EMP_EMAIL,
emp_salary = :P1_EMP_SALARY,
emp_hire_date = TO_DATE(:P1_EMP_HIRE_DATE, 'YYYY-MM-DD')
WHERE emp_id = :P1_EMP_ID;
COMMIT;
END;
This will update the values in the database when the update button is clicked.
Updating Values in an Interactive Grid
Interactive Grids allow users to update multiple records inline.
Step 1: Create an Interactive Grid
In Oracle APEX, go to your application and click Create Page.
Select Report, then Interactive Grid.
Choose the table (EMPLOYEE_DATA) and primary key (EMP_ID).
Click Next, then Finish.
Step 2: Enable Editing in the Interactive Grid
Open Page Designer and select the Interactive Grid Region.
Under Attributes, set Edit Enabled to Yes.
Run the page, edit values directly in the grid, and click Save to update records.
Updating Values Using Classic Reports with Edit Links
If you want users to update records from a classic report:
Step 1: Add an Edit Link to a Classic Report
Open Page Designer and select your Classic Report.
Add a new column for the edit link using the following SQL:
SELECT emp_id,
emp_name,
emp_email,
emp_salary,
emp_hire_date,
'<a href="f?p=&APP_ID.:10:&SESSION.::NO:RP,10:P10_EMP_ID:' || emp_id || '">Edit</a>' AS edit_link
FROM employee_data;
Click Save and Run.
Step 2: Create an Edit Form on Another Page
Create a new form page where users can edit records.
Add a hidden item P10_EMP_ID to store the record ID.
Modify the form to fetch existing values:
SELECT emp_name, emp_email, emp_salary, emp_hire_date
INTO :P10_EMP_NAME, :P10_EMP_EMAIL, :P10_EMP_SALARY, :P10_EMP_HIRE_DATE
FROM employee_data
WHERE emp_id = :P10_EMP_ID;
Add an Update button with a PL/SQL process to update the record.
Now, clicking Edit in the report will open the form with the selected record.
Updating Values Using Dynamic Actions (Without Page Submit)
If you want to update values without submitting the page, use AJAX and Dynamic Actions.
Step 1: Create an AJAX Process
Go to Shared Components > Application Processes.
Create a process named UPDATE_EMPLOYEE_DATA and set Type to PL/SQL AJAX Process.
Use the following code:
BEGIN
UPDATE employee_data
SET emp_name = :P1_EMP_NAME,
emp_email = :P1_EMP_EMAIL,
emp_salary = :P1_EMP_SALARY,
emp_hire_date = TO_DATE(:P1_EMP_HIRE_DATE, 'YYYY-MM-DD')
WHERE emp_id = :P1_EMP_ID;
COMMIT;
END;
Step 2: Create a Dynamic Action
In Page Designer, select the Update Button.
Click Create Dynamic Action and set:
Event: Click
Action: Execute JavaScript
Add the following JavaScript code:
apex.server.process("UPDATE_EMPLOYEE_DATA", {
pageItems: "#P1_EMP_ID, #P1_EMP_NAME, #P1_EMP_EMAIL, #P1_EMP_SALARY, #P1_EMP_HIRE_DATE"
}, {
success: function(data) {
alert("Record updated successfully!");
},
error: function(request) {
alert("Error updating record.");
}
});
This method updates values in real time without refreshing the page.
Best Practices for Updating Data in APEX
Use Forms for Single Record Updates: Best for updating one record at a time.
Use Interactive Grids for Bulk Updates: Best for updating multiple records quickly.
Use Classic Reports with Edit Links: Good for linking reports to an edit form.
Use Dynamic Actions for Live Updates: Best for seamless user experience.
Validate Inputs Before Updating: Prevent errors and invalid data entries.
Oracle APEX provides multiple ways to update records, including forms, interactive grids, classic reports, PL/SQL processes, and AJAX dynamic actions. The best method depends on your application's needs.
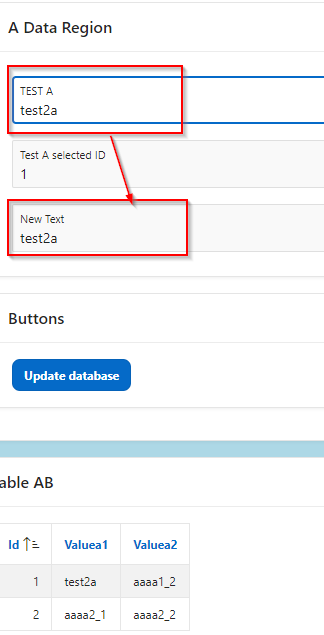
EXAMPLE:
We have a dropdown that will display the value in one text box and the display text in a second text box. The goal is t to update the Text from the list by changing the text in the “New Item” text box and saving that in the table.
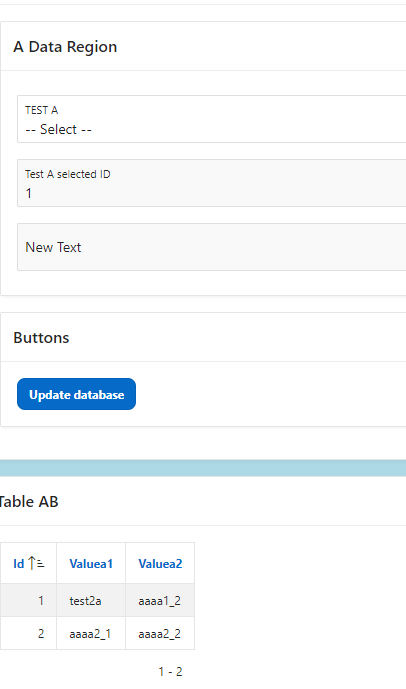
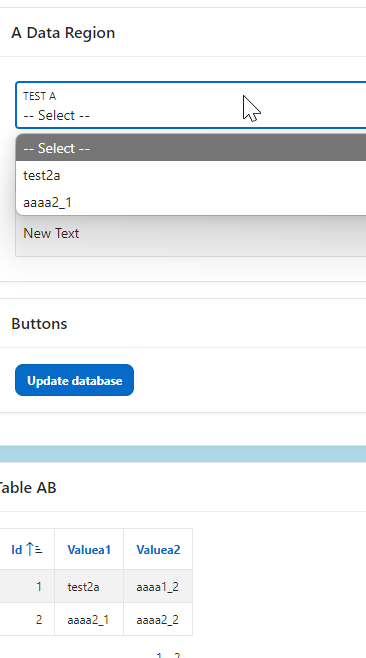
Step 1 – Add the dropdown list and two text boxes.
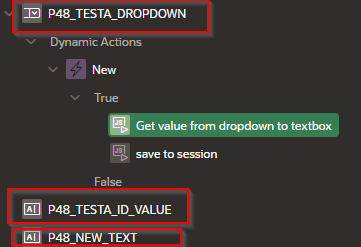
Step 2- Add the following settings in the first true branch
The code is as follows
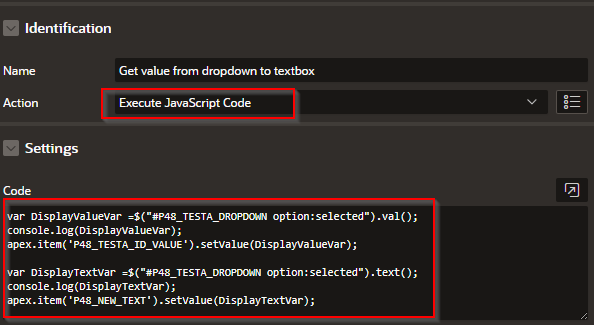
---- This part of the code gets the VALUE from the list and saves it to the 'P48_TESTA_ID_VALUE' text box.
var DisplayValueVar =$("#P48_TESTA_DROPDOWN option:selected").val();
console.log(DisplayValueVar);
apex.item('P48_TESTA_ID_VALUE').setValue(DisplayValueVar);
---- This part of the code gets the TEXT from the list and saves it to the 'P48_NEW_TEXT' text box.
var DisplayTextVar =$("#P48_TESTA_DROPDOWN option:selected").text();
console.log(DisplayTextVar);
apex.item('P48_NEW_TEXT').setValue(DisplayTextVar);
Step 3 – Add the second true branch for saving to the session
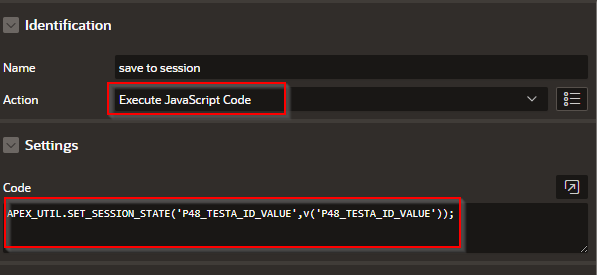
The next code saves the information to the session.The code is as follows:
APEX_UTIL.SET_SESSION_STATE('P48_TESTA_ID_VALUE',v('P48_TESTA_ID_VALUE'));
Step 4 – Next add a button with a Dynamic Action and two True Branches
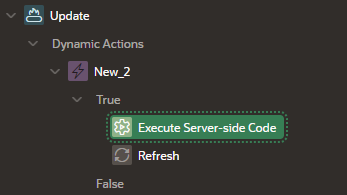
Step 5 – First True branch

Identification > Action: set to Execute Server-side Code
Settings
> Language: PL/SQL
> PL/SQL Code
BEGIN
UPDATE TEST_A
SET VALUEA1 = :P48_NEW_TEXT
WHERE ID = :P48_TESTA_ID_VALUE;
END;
> Items to Submit – This passes the information into the SQL above.
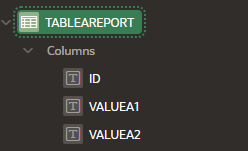
Step 7 – Add a classic report to display the data of the table and set the following values
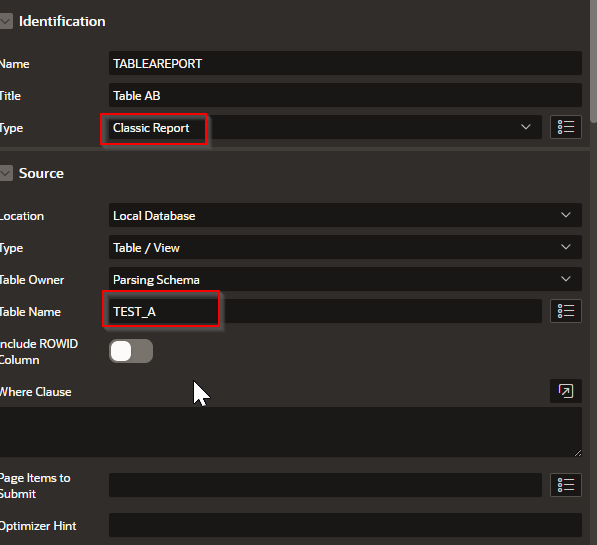
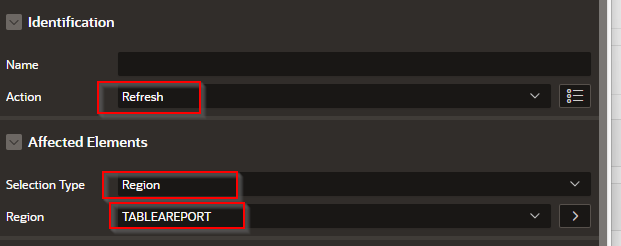
Step 6 – Set the refresh for the table report
Conclusion
Updating table values from form controls in Oracle APEX is a seamless process when using the platform’s built-in form functionality or customized PL/SQL logic. With the ability to bind form items to table columns, or handle the update manually through button-driven processes, developers have full flexibility in designing responsive and dynamic data-editing features. Proper configuration ensures that data integrity is preserved, user experience is smooth, and application maintenance remains straightforward.


No comments:
Post a Comment