Adding buttons and links in Classic Reports in Oracle APEX significantly enhances the interactivity and usability of your application. By incorporating these elements, developers can provide users with quick actions such as navigating to detail pages, triggering processes, or opening external resources directly from the report. This capability allows for a more dynamic and user-friendly interface, improving overall application efficiency and user experience.
Adding Buttons and Links in Classic Reports in Oracle APEX
Classic Reports in Oracle APEX are highly customizable, allowing developers to add buttons and links that enable users to take action directly from the report. This tutorial covers how to add buttons and links inside a Classic Report, configure them to trigger actions, and enhance their appearance using CSS and JavaScript.
Why Add Buttons and Links in Classic Reports?
Adding buttons and links in a Classic Report enhances usability by allowing users to:
Navigate to a detail or edit page.
Perform quick actions such as deleting or updating records.
Open modal dialogs for viewing or editing records without leaving the page.
Execute PL/SQL procedures or JavaScript functions.
Methods for Adding Buttons and Links in Classic Reports
Using APEX_ITEM to Add Buttons or Links in SQL Query
APEX provides built-in functions to dynamically generate buttons and links inside a Classic Report query.
Example of adding an Edit button:
-
Prepare Your Classic Report
Start with a Classic Report region based on a SQL query that returns the necessary data. For example:
SELECT EMPLOYEE_ID, FIRST_NAME, LAST_NAME, DEPARTMENT_ID
FROM EMPLOYEES
This report will display employee information, and you may want to add buttons or links to edit, delete, or view details.
-
Add Link Columns in the SQL Query
To add buttons or links, you often add an extra column in your SQL query that generates HTML code for the button or link. For example, to create a link to an employee detail page:
SELECT EMPLOYEE_ID,
       FIRST_NAME,
       LAST_NAME,
       DEPARTMENT_ID,
       '<a href="f?p=&APP_ID.:10:&SESSION.:NO::P10_EMPLOYEE_ID:' || EMPLOYEE_ID || '">Details</a>' AS DETAILS_LINK
FROM EMPLOYEES
In this example, the last column DETAILS_LINK contains an HTML anchor tag linking to page 10, passing the employee ID as a page item P10_EMPLOYEE_ID.
-
Set the Column to Display as Standard Report Column with Escape Special Characters Disabled
In Oracle APEX:
-
Go to the Page Designer.
-
Locate your Classic Report region.
-
Find the column containing the link (e.g.,
DETAILS_LINK). -
Set the column property Escape Special Characters to No. This allows the HTML to be rendered as a clickable link rather than displaying as text.
-
Using Buttons Instead of Links
If you want a button instead of a simple hyperlink, modify the SQL to include button styling:
'<button type="button" onclick="window.location.href=\'f?p=&APP_ID.:10:&SESSION.:NO::P10_EMPLOYEE_ID:' || EMPLOYEE_ID || '\'">Edit</button>' AS EDIT_BUTTON
Again, set Escape Special Characters to No for this column.
-
Using APEX URL Syntax for Links
Oracle APEX has a special syntax to create URLs using substitution strings, making it easier and more maintainable. Example:
SELECT EMPLOYEE_ID,
       FIRST_NAME,
       LAST_NAME,
       DEPARTMENT_ID,
       APEX_UTIL.PREPARE_URL('f?p=&APP_ID.:10:&SESSION.:NO::P10_EMPLOYEE_ID:' || EMPLOYEE_ID) AS EDIT_URL
FROM EMPLOYEES
Then, you create the link using standard HTML in the column.
-
Dynamic Actions with Buttons and Links
You can also assign dynamic actions or JavaScript events to your buttons or links for richer behavior, such as confirmation dialogs before deleting a record. -
Use Substitution Strings for Maintainability
Use substitution strings like&APP_ID.,&SESSION., and bind variables to ensure the links remain correct regardless of application changes.
Example of adding an Edit button:
SELECT
empno,
ename,
job,
apex_item.button(1, 'Edit', p_attributes => 'class="edit-btn" data-empid="' || empno || '"') AS edit_button
FROM emp
In this example:
The apex_item.button function generates a button inside the report.
The class="edit-btn" allows styling and event handling via CSS and JavaScript.
The data-empid="..." stores the employee ID for JavaScript actions.
Adding Links Using APEX_UTIL
Links can be dynamically generated within a SQL query to allow users to navigate to another page or trigger actions.
Example of creating an Edit link that navigates to another page:
SELECT
empno,
ename,
job,
'<a href="' || apex_util.prepare_url('f?p=&APP_ID.:10:&SESSION.::NO::P10_EMPNO:' || empno) ||
'" class="edit-link">Edit</a>' AS edit_link
FROM emp
In this example:
apex_util.prepare_url ensures that session and security settings are included in the URL.
The link directs the user to Page 10, passing the empno as a parameter (P10_EMPNO).
The Edit link can be styled using CSS or targeted with JavaScript.
Using APEX_LINK to Generate Links
The apex_link function can be used to create cleaner links:
SELECT
empno,
ename,
job,
apex_link('f?p=&APP_ID.:10:&SESSION.::NO::P10_EMPNO:' || empno, 'Edit') AS edit_link
FROM emp
This method ensures the link is properly formatted without manually adding HTML tags.
Adding Action Buttons in the Report Attributes
Go to the Classic Report region in your APEX page.
Edit the report’s columns and choose a column where you want to add a button or link.
Set the column Display As to Link.
Configure the Target to navigate to another page, execute JavaScript, or trigger a PL/SQL action.
Optionally, add Static IDs or CSS Classes to apply styles and behavior.
Enhancing Buttons and Links with CSS
Custom styling makes the buttons and links stand out:
.edit-btn {
background-color: #007bff;
color: white;
border: none;
padding: 5px 10px;
cursor: pointer;
}
.edit-btn:hover {
background-color: #0056b3;
}
.edit-link {
color: #007bff;
text-decoration: none;
font-weight: bold;
}
.edit-link:hover {
text-decoration: underline;
}
Handling Button Clicks with JavaScript
To execute actions when a button is clicked, use JavaScript and jQuery.
Example of using JavaScript to handle an Edit button click:
$(document).on("click", ".edit-btn", function() {
var empId = $(this).data("empid");
alert("Editing Employee: " + empId);
window.location.href = "f?p=&APP_ID.:10:&SESSION.::NO::P10_EMPNO:" + empId;
});
This script:
Detects when an Edit button is clicked.
Retrieves the associated employee ID from data-empid.
Redirects to Page 10, passing the employee ID as a parameter.
Executing PL/SQL with AJAX on Button Click
To execute a PL/SQL process without reloading the page, use apex.server.process.
Create an Application Process named UPDATE_EMPLOYEE.
Add the following PL/SQL code:
BEGIN
UPDATE emp SET job = 'Updated' WHERE empno = :P10_EMPNO;
COMMIT;
END;
Add JavaScript to trigger the process when clicking a button:
$(document).on("click", ".update-btn", function() {
var empId = $(this).data("empid");
apex.server.process("UPDATE_EMPLOYEE", {
x01: empId
}, {
success: function(data) {
alert("Employee updated successfully!");
}
});
});
This script:
Triggers the UPDATE_EMPLOYEE process.
Passes empId using x01.
Shows an alert once the update is complete.
Best Use Cases for Buttons and Links in Classic Reports
Editing or deleting records directly from a report.
Navigating to detail pages using a dynamic ID.
Opening modal dialogs for inline editing.
Triggering PL/SQL actions such as status updates.
Adding buttons and links inside a Classic Report enhances the user experience by providing quick actions. Using APEX functions like apex_item.button, apex_util.prepare_url, and apex_link, developers can create interactive reports that improve navigation and workflow efficiency. Additional customization with CSS and JavaScript further enhances usability, making reports more dynamic and user-friendly.
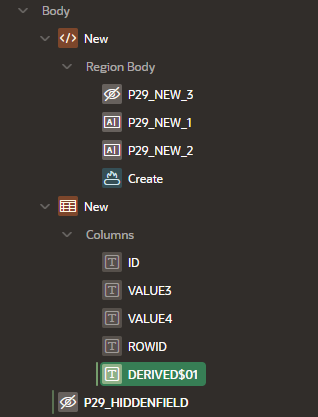
EXAMPLES:
How do I add a button to a classic report
Step 1- Add a button to the report.
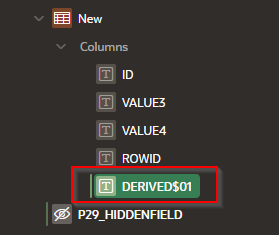
Step 2- Create it into a type: Plain Text

Step 3- Format the HTML to add a button of HTML
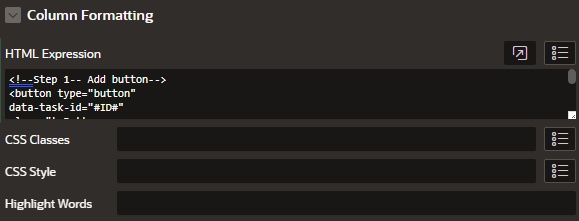
Here is the code
<!--Step 1-- Add button-->
<!-- data-task-id="#ID#" is used to save the ID to delete-->
<!-- cc-delete-btn is used to call the button from javascript-->
<button type="button"
data-task-id="#ID#"
class="t-Button
t-Button--icon
t-Button--hot
t-Button--danger
t-Button--simple
t-Button--iconLeft
cc-delete-btn"> <!-- This is used -->
<span aria-hidden="true" class="t-Icon t-Icon--left fa fa-trash"></span>
Delete</button>
Step 4 -
Add a hidden field to the region.
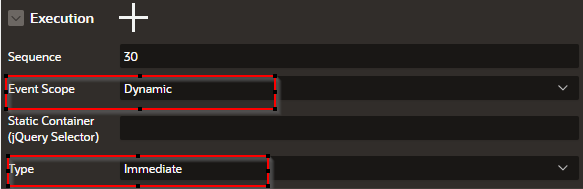
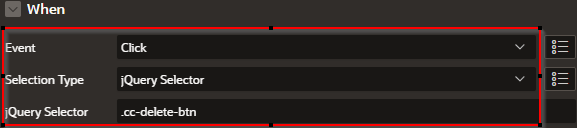
Step 5 – Create the “Delete Task”. You have to manually create your Dynamic Action in the “Dynamic Action” area, under the “Click” event.
Add a name: In this case “Delete Task”
Set Execution > Event Scope: Dynamic
Set Execution > Type : Immendiate
Set When > Event: Click
Set When > Selection Type: JQuery Selector
Set When > jQuery Selector: .cc-delete-btn

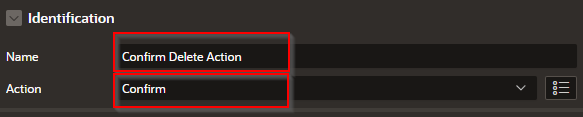
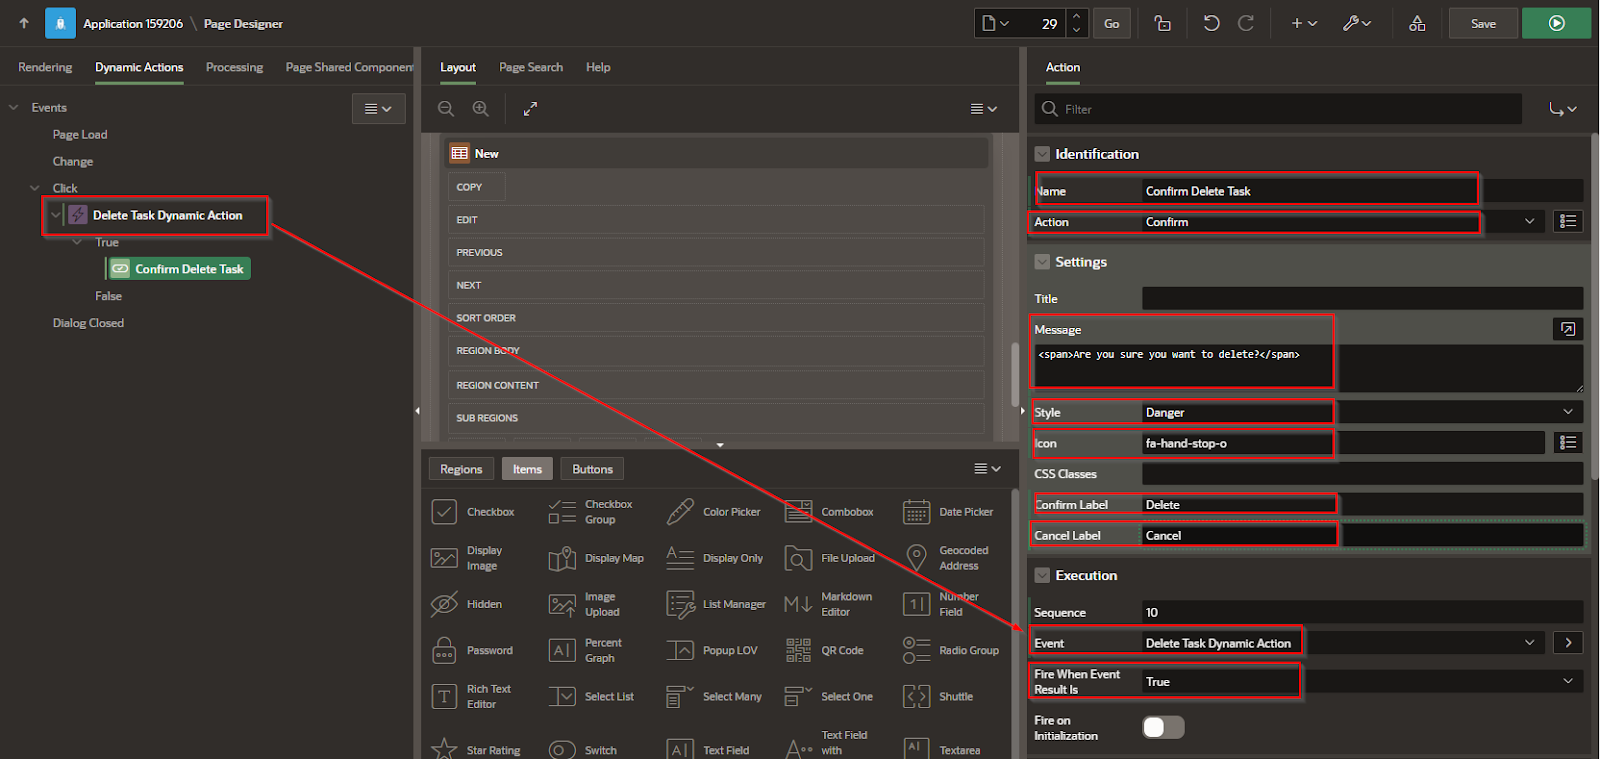
Step 6- In the first True action
Identification > Name: Confirm Delete Action
Identification > Action: Confirm
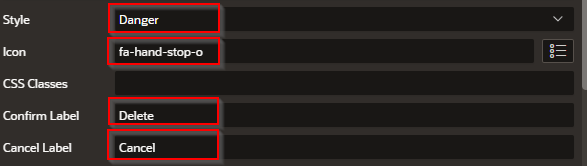
Settings > Message: <span> Are you sure you want to delete</span>
Settings > Style: Danger
Settings > Icon: fa-hand-stop-o
Settings > Confirm Label : Delete
Settings > Cancel Label: Cancel
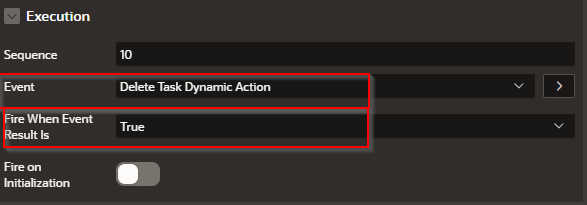
Execution > Event: Delete Task Dynamic Action (The name of the Dynamic Action that fires the “True” event)
Execution > Fire On Initialization: True
Notice the Event Name
Step 7- Create a second True event and name it : Set Id for deletion
Set Identification> Name > set Id for deletion
Identification > Action: Execute Javadcript Code
Setting > Code:

let taskIdToDelete = $(this.triggeringElement).data('taskId');
console.log(taskIdToDelete);
apex.items.P29_HIDDENFIELD.setValue(taskIdToDelete);
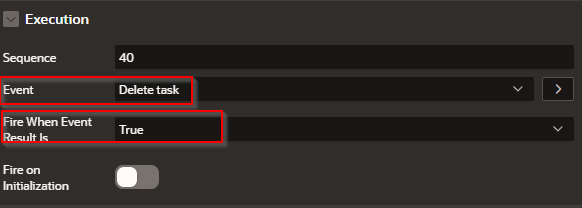
Execution > Event: Delete Task
Execution > Fire when Event Result Is: True
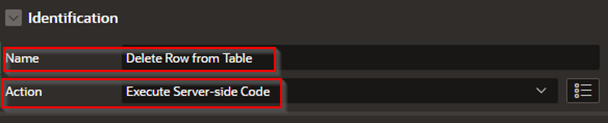
Step 8 – Create the Delete Row From Table TRUE action
Set Identification > Name: Delete Row from Table
Identification > Action: Execute Server-side Code
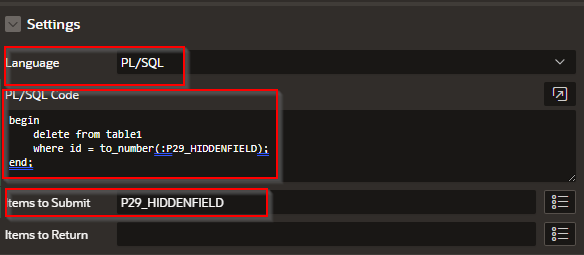
Settings> PL/SQL
Settings> PL/SQL Code:
begin
delete from table1
where id = to_number(:P29_HIDDENFIELD);
end;
Settings> Items to Submit: P29_HIDDENFIELD
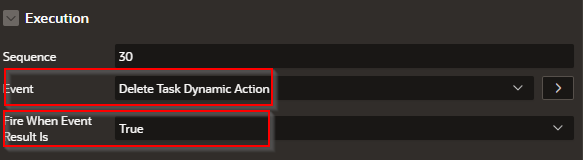
Execution > Event: Delete Task Dynamic Action
Execution > Fire when Event Resuls Is: True
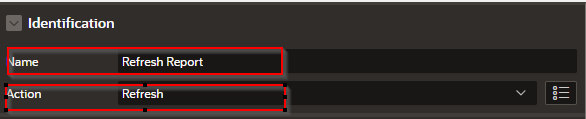
Step 9 – Create a 4th True Action called “Refresh Report”
Identification > Name: Refresh report
Identification > Action: Refresh
Affect Elements > Selection Type; region
Affect Elements > Region : (Put the name of the report region)
Execution > Event: Delete task
Execution > Fire When Event Result Is: True

Adding buttons and links in Classic Reports involves embedding HTML elements into your SQL query, disabling escaping for the column, and optionally styling the buttons with CSS or JavaScript. This method provides powerful navigation and action capabilities directly within report rows, improving user interaction and application flow in Oracle APEX.
In conclusion, integrating buttons and links into Classic Reports is a powerful way to extend their functionality beyond simple data display. With careful configuration, these interactive elements streamline user workflows, promote intuitive navigation, and enable direct access to related pages or features. Mastering this technique is essential for building responsive and effective Oracle APEX applications.


