Adding a navigation button to a card in Oracle APEX allows users to quickly jump from a summarized data view to a more detailed page or another section of the application. Cards provide a modern, tile‑based layout for displaying records, and embedding a button—such as “View Details” or “Edit”—directly on each card enhances interactivity and streamlines navigation. This blog post will explain how to configure a card region’s Link or Button attributes to include a navigation control that passes key item values to the target page, ensuring a seamless user experience.
In Oracle APEX, adding a navigation button to each card in a Cards region lets users click directly from a visual tile to a detailed page or another area of your application. You can achieve this by configuring the Cards region’s Link settings to render a button or clickable area with the correct target page and parameter mappings.
-
Open the page in Page Designer and locate the Cards region.
-
Expand the Cards region node and click on Attributes.
-
In the Card Columns section, find the Link Column property and select the column (or alias) you want to use as your link target—this can be your primary key or any unique identifier field in your SQL query.
-
Still under Attributes, locate the Link sub‑section. Set Page to the target page number you want users to navigate to when they click the button (for example, Page 20).
-
In the Set Items field, enter the name of the page item(s) on the target page (for example, P20_RECORD_ID).
-
In the With Values field, specify the substitution for each link column value using the notation
#COLUMN_NAME#(for example,#ID#). If you have multiple items, separate them with commas. -
To render a button instead of turning the entire card into a link, switch the Link Text property to the label you want on the button (for example, “View Details”). Cards will automatically display that text as a button or hyperlink.
-
Optionally, customize the appearance under Appearance by assigning a CSS class (for example, “u-button”) to style your button consistently with your theme.
-
Save and run the page. Each card will now display a “View Details” button (or your chosen label). Clicking it submits a redirect to the specified page, passing the correct record ID so the detail page can show the corresponding data.
By following these steps, you integrate clear, inline navigation controls into your card layout, making it easy for users to drill down from a high‑level overview to detailed content with a single click.
Example
Adding a Navigation Button to a Card in Oracle APEX
In Oracle APEX, cards are a great way to display structured information in a visually appealing format. Adding a navigation button to a card enhances user experience by allowing users to navigate to another page, open a modal dialog, or trigger a process.
This tutorial covers how to add a navigation button to a card in APEX, configure it to link to another page, and customize its appearance.
Step 1: Creating a Cards Report
Before adding a navigation button, ensure that you have a Cards Report in your application.
Open Oracle APEX and navigate to your application.
Create a new Cards Report by selecting:
Create → Page → Report → Cards Report
Choose a table or SQL query as the data source.
Configure the Card Attributes such as Title, Body, and Media.
Click Create and save the page.
If you already have a Cards Report, proceed to the next step.
Step 2: Adding a Navigation Button to the Card
Method 1: Using the Card Actions Attribute
Open the Cards Report in Page Designer.
Select the Cards Region in the Rendering Tree.
In the Attributes section, locate the Actions option.
Click Add to create a new action.
Choose Button as the action type.
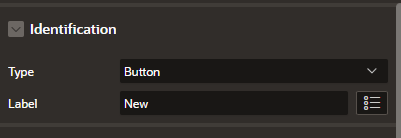
Configure the button label (e.g., "View Details").
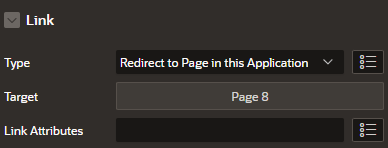
Set the Action Type to Redirect to Page in this Application.
Choose the Target Page Number where the button should navigate.
(Optional) Pass a parameter by adding Set Items:
Item Name: PXX_ID
Value: #ID# (Replace with the appropriate column)
Click Save and Run the Page to test the button functionality.
Method 2: Adding a Navigation Button via a SQL Query
If you are using a Custom SQL Query for the Cards Report, you can embed a navigation link directly in the SQL.
Open the Cards Report in Page Designer.
Modify the SQL Query to include a link in the Actions column:
SELECT
ID,
TITLE,
DESCRIPTION,
IMAGE_URL,
'f?p=&APP_ID.:20:&SESSION.::NO::P20_ID:' || ID AS ACTION_LINK
FROM EMPLOYEES
In Cards Attributes, set Action Type to Link and choose ACTION_LINK as the URL column.
Save and test the report.
This method dynamically generates navigation buttons based on the database values.
Step 3: Styling the Navigation Button with CSS
To improve the button’s appearance, apply custom CSS.
Go to Shared Components → Themes → Custom CSS.
Add the following CSS:
.t-Card-actions a {
background-color: #0073e6;
color: white;
padding: 8px 12px;
border-radius: 5px;
text-decoration: none;
display: inline-block;
}
.t-Card-actions a:hover {
background-color: #005bb5;
}
Save and refresh the page.
This makes the button stand out with a professional look.
Step 4: Using Dynamic Actions for Custom Behavior
Instead of a direct navigation link, you can trigger a Dynamic Action when the button is clicked.
Open Page Designer and select the Cards Report.
Click Dynamic Actions → Create.
Set Event to Click.
Choose Affected Element → Button Selector (.t-Card-actions a).
Define the Action (e.g., Redirect to Page, Open Modal, or Show Message).
Save and test the behavior.
This approach is useful for adding confirmations or pop-ups before navigation.
Step 5: Testing and Best Practices
Run the page and click the button to ensure it navigates correctly.
Use item substitution to pass dynamic values between pages.
Ensure accessibility by using appropriate button labels and colors.
Optimize performance by limiting SQL query complexity.
Adding a navigation button to a card in APEX enhances interactivity and user experience. Whether using built-in Card Actions, SQL-based links, CSS styling, or Dynamic Actions, you can customize the button to fit your application’s needs.
EXAMPLE:
Step 1 – Create an “Action” in the card (Note: this is not the same as an Dynamic Action)
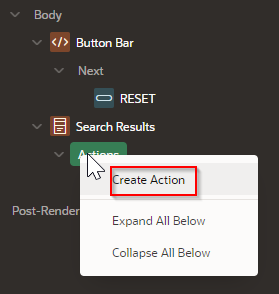
Step 2- make the Action Type “Button.
Step 3 Set the redirect page information.
Set Page to the page number that you want to navigate.
Set Name to the item in page 8 that will get some data from this current page.
In this case P8_ID is the item on page 8 that holds the value for the key identifier of the table.
Set Value to the value that you want to pass into the item in page 8.
In this case is “&ID.” The “&” at the front of the value and the “.” At the end of the value are required.
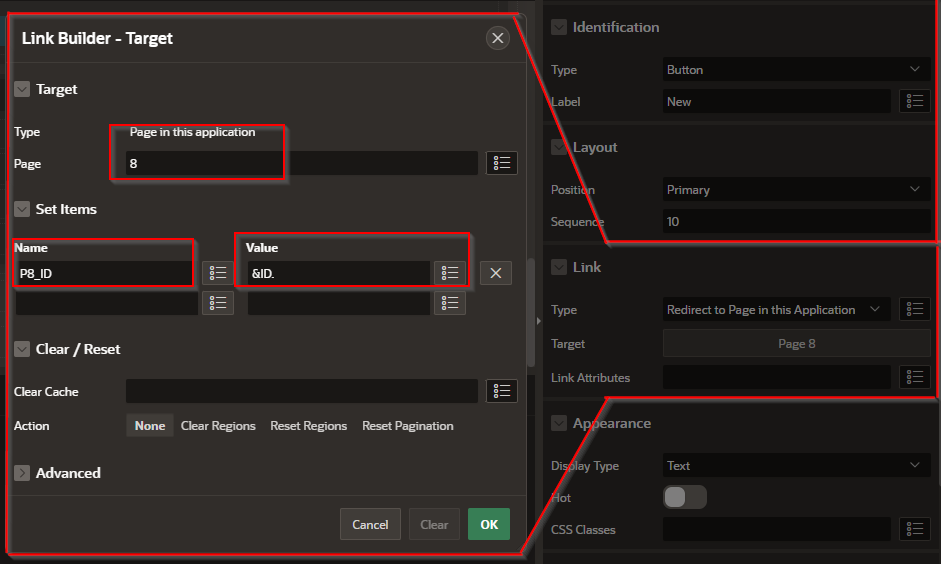
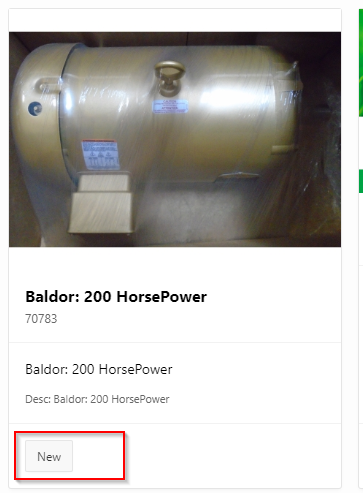
The card should look something like this:
In conclusion, adding a navigation button to cards in Oracle APEX combines visual appeal with functional efficiency. By configuring the card region’s Link or Button Column settings, and supplying the appropriate page number and item mappings, you enable users to move effortlessly from a high‑level overview to detailed views. This approach improves both usability and workflow, making your APEX applications more intuitive and user‑friendly.


