Creating a master-detail layout in Oracle APEX is a powerful way to display related data in a clear and organized manner. This approach allows users to view a master record alongside its detailed records, enhancing usability and data navigation. When using a detail single record form layout, each detail record can be viewed or edited individually, providing a focused interface for data entry or review. Master-detail layouts are commonly used in applications such as order management, where an order (master) has multiple line items (details).
Master-detail single record form layouts improve user experience by keeping the data context visible and accessible, while simplifying interaction with each detail record. In Oracle APEX, you can create this layout by defining a master region and linking it with a detail region configured as a single record form. This setup supports CRUD operations on both master and detail records, ensuring data integrity and ease of maintenance.
Creating a master-detail layout with a detail single record form in Oracle APEX involves setting up two linked regions: one to display the master data and another to manage detail records one at a time. This layout is especially useful when you want users to view or edit a single detail record related to a selected master record, providing a clear and focused interface.
Here is a detailed step-by-step guide on how to create a master-detail page with a detail single record form layout in Oracle APEX:
-
Prepare Your Tables and Relationships
Ensure you have two tables with a parent-child relationship. For example, a MASTER table (e.g., ORDERS) and a DETAIL table (e.g., ORDER_ITEMS), where ORDER_ITEMS has a foreign key referencing ORDERS. -
Create a New Page
In Application Builder, create a new page and select the Master-Detail page type. Oracle APEX provides a wizard to simplify this process. -
Select Master and Detail Tables
In the wizard, select your master table first (ORDERS), then select your detail table (ORDER_ITEMS). The wizard will detect the foreign key relationship automatically. -
Choose Layout Options
When prompted for the detail region layout, select Form - Single Record for the detail region. This means the detail region will display one detail record at a time, allowing easy editing and review. -
Configure Master Region
The master region typically is a report or interactive grid showing all master records. It allows users to select the master record they want to work with. -
Configure Detail Single Record Form
The detail form will show fields for a single detail record linked to the selected master. The form automatically filters detail records based on the master record’s primary key. -
Link Master and Detail Regions
The wizard will create a master-detail link by setting a page item with the master record’s primary key. This link ensures that when a master record is selected, only the related detail records appear. -
Set Navigation Buttons
The detail form should have navigation buttons such as Next, Previous, Create, Delete, and Save. These allow users to move through the detail records one at a time, create new detail entries, or delete existing ones. -
Adjust Page Items and Validations
Customize the form fields, set validations, and apply any formatting or UI Defaults as needed for your application’s requirements. -
Test the Page
Run the page in your application to verify the master-detail behavior. Selecting a master record should refresh the detail form to show the corresponding detail records, allowing individual editing.
This approach provides a clean and user-friendly interface for managing parent-child data, making it easier to maintain data integrity and improve usability. The single record detail form focuses user attention on one detail at a time, reducing errors and simplifying data entry tasks.
By leveraging Oracle APEX’s built-in master-detail wizards and form regions, you can quickly build sophisticated layouts that meet complex business needs without extensive manual coding.
Example
Creating a Master-Detail Report in Oracle APEX
A Master-Detail Report in Oracle APEX allows users to view related sets of data on the same page. The master section displays a high-level overview, while the detail section provides specific records related to the selected master record. This type of report is useful for applications that need to show hierarchical or relational data, such as customers and their orders, departments and employees, or projects and tasks.
This tutorial explains how to create a Master-Detail Report in APEX using an Interactive Report for the master data and an Interactive Grid for the detail data.
Understanding Master-Detail Relationships
A Master-Detail relationship exists when one record in a master table corresponds to multiple related records in a detail table.
For example, in an HR application:
The Master table is "Departments," displaying a list of departments.
The Detail table is "Employees," showing employees working in the selected department.
The two tables are related by a foreign key, where the "Employees" table has a column referencing the "Department ID" from the "Departments" table.
Steps to Create a Master-Detail Report
Step 1: Prepare the Database Tables
Ensure that the database contains two related tables. Below is an example of a simple master-detail relationship:
CREATE TABLE DEPARTMENTS (
DEPT_ID NUMBER PRIMARY KEY,
DEPT_NAME VARCHAR2(100)
);
CREATE TABLE EMPLOYEES (
EMP_ID NUMBER PRIMARY KEY,
EMP_NAME VARCHAR2(100),
DEPT_ID NUMBER REFERENCES DEPARTMENTS(DEPT_ID)
);
Step 2: Create a New Page in APEX
Open Oracle APEX and navigate to your application.
Click on Create → Page.
Select Master-Detail as the page type.
Choose the Master table (Departments) and the Detail table (Employees).
Click Next, provide a page name, and finish the setup.
Step 3: Configure the Master Report
APEX will generate an Interactive Report for the Master section (Departments).
This report should display key department information like Department ID and Department Name.
Ensure the Department ID column is selected as a primary key.
The report should allow users to select a department to view related employees.
Step 4: Configure the Detail Report
The Detail section will be created as an Interactive Grid, linked to the selected Department ID.
APEX automatically sets up the grid to filter employees based on the selected department.
Ensure that Department ID is passed as a parameter to the detail grid.
The grid should include relevant fields such as Employee ID, Employee Name, and Department ID.
Step 5: Implement the Filtering Mechanism
To ensure that selecting a department updates the employee list dynamically:
Open the Master Report (Departments Interactive Report).
Add a Dynamic Action that triggers when a row is selected.
Choose Set Value and set the value of PXX_DEPT_ID (where XX is your page number) to the selected DEPT_ID.
Add another action to refresh the Employee Interactive Grid so that it updates when a department is selected.
Step 6: Test and Enhance the Report
Run the page and verify that selecting a department updates the list of employees.
Add additional formatting such as:
Highlighting rows in the detail grid for active employees.
Adding a search bar in the master report to quickly find a department.
Allowing inline editing in the detail grid to update employee records directly.
Additional Enhancements
Sorting and Filtering: Enable users to sort or filter records in both sections.
Styling with CSS: Use CSS to style the master-detail relationship, making it visually appealing.
Custom JavaScript: Enhance interactivity by adding animations or auto-refresh options.
Best Use Cases for Master-Detail Reports
Customer and Orders: View customer details in the master report and related orders in the detail section.
Projects and Tasks: Manage projects with tasks listed in a related detail grid.
Departments and Employees: Assign employees to departments and view them dynamically.
A Master-Detail Report in APEX improves data visualization by allowing users to navigate hierarchical relationships efficiently. Using an Interactive Report for the master section and an Interactive Grid for the detail section provides a user-friendly interface that supports real-time data updates, filtering, and inline editing.
EXAMPLES:
There are two ways of doing this…
The Easy Way – Using a Classic Report
Step 1- Create a Master- Detail page AND in the detail page, there will likely be TWO Classic Reports
Report 1 – Is likely to have only a few fields
Report 2 – Is likely to have many more fields
Step 2- Take the first report
Duplicate the report
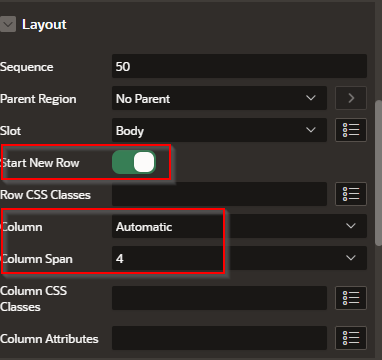
In regions> layout Set the following settings
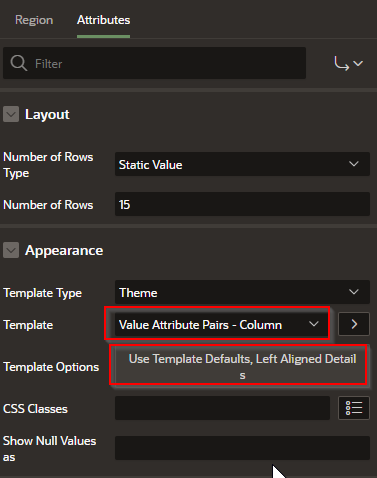
In the Attributes > Appearance do the following:
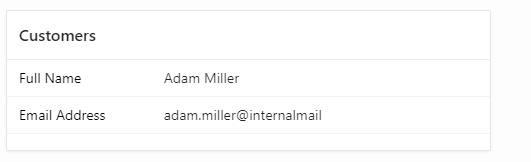
That will give you something like this:
Add additional columns as needed.
The slightly harder way – Using Forms
In Forms there is a pre-rendering process that actually performs the query. That is, out of the box, a form expects to have the PK for the form source when the whole page is loaded - Not after you click something and expect the form to become refreshed. That is, forms are page loaded, not dynamically refreshed like reports.
Step 1 – Drag a Form into the page
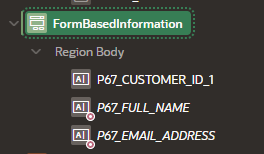
Step 2 - Create a Dynamic Action in the “Page Load”
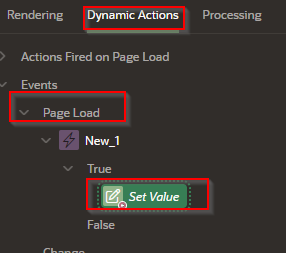
Step 3 – In the Actions of the True side of the Page Load enter the following.
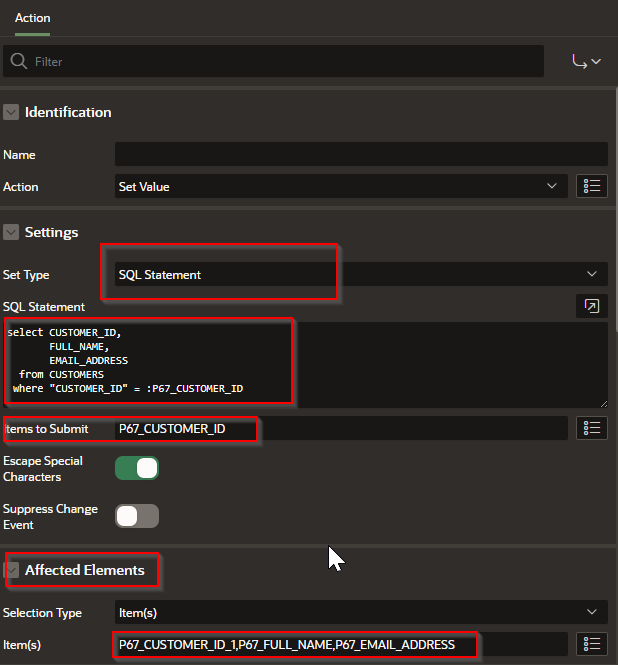
We are using the following code
select CUSTOMER_ID,
FULL_NAME,
EMAIL_ADDRESS
from CUSTOMERS
where "CUSTOMER_ID" = :P67_CUSTOMER_ID
Notice how the values match the fields
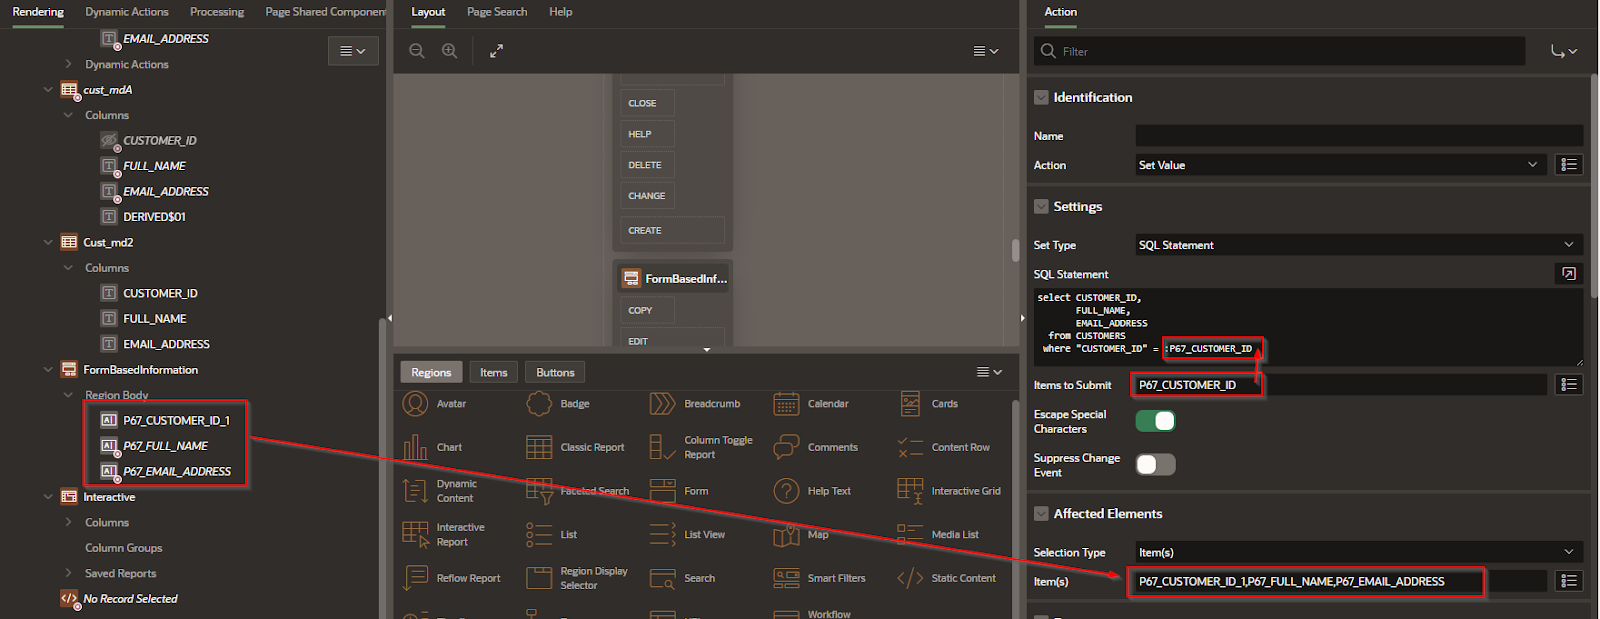
Step 4 – In the form > Region >Sourceset the following

Step 4 - Form > Attributes Disable the Edit

Step 5 – For each column of the form do the following;

Customers is the table, Email_Address is the column, and :P67_CUSTOMER_ID is the value passed from the master to the detail
select 1 from "CUSTOMERS"
where "EMAIL_ADDRESS" is not null
and "CUSTOMER_ID" = :P67_CUSTOMER_ID
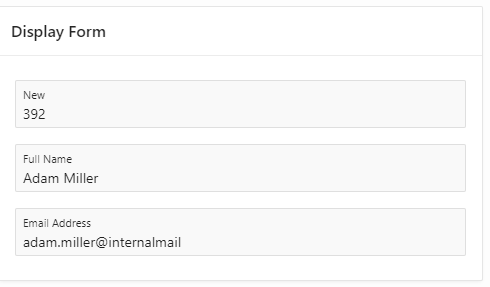
Now it should look something like this
By implementing a master-detail single record form layout, developers can deliver an intuitive interface that streamlines workflows and increases productivity. This approach helps users focus on one detail record at a time while always maintaining the connection to the master data, creating a seamless and efficient user experience.


