In Oracle APEX, creating a dynamic and intuitive user experience often involves enabling or disabling form controls based on user input. For example, you might want to enable a text field only when a certain checkbox is selected or disable a button unless a dropdown has a value. This type of interaction enhances usability, prevents errors, and guides users through forms more effectively. Oracle APEX provides a straightforward way to achieve this behavior using Dynamic Actions, without requiring complex coding. By leveraging built-in client-side events and conditions, you can make your applications smarter and more responsive.
In Oracle APEX, enabling and disabling controls based on the values of other controls is done through Dynamic Actions. This feature allows you to create client-side interactivity without writing JavaScript manually. For example, you can enable a text field only when a user selects a checkbox, or disable a button when a value is missing in a select list. Below is a detailed explanation of how to implement this behavior.
Step-by-Step: Enable or Disable Controls Using Dynamic Actions
1. Open Your Page in Page Designer
Go to the Application Builder, open your app, and then choose the page that contains the controls you want to link together.
2. Select the Triggering Item
This is the item that will be used to control another item. For example, a checkbox named P1_ACCEPT_TERMS.
3. Create a New Dynamic Action
-
In Page Designer, click on the Dynamic Actions section (in the left pane).
-
Click the + icon to create a new Dynamic Action.
-
Give it a meaningful name, such as
Enable Submit Button.
4. Define the Event
-
Event: Choose the relevant event. Typically this would be
Change(when the item value changes). -
Selection Type: Item(s)
-
Item(s): Select your control item (e.g.,
P1_ACCEPT_TERMS)
5. Create the True Action (Enable Control)
-
Action: Enable or Disable (depending on what you want to do)
-
Selection Type: Item(s)
-
Item(s): Select the control you want to enable or disable (e.g.,
P1_SUBMIT_BUTTON) -
Fire on Page Load: Choose this if you want the logic to apply when the page loads
6. Define the Condition (Client-Side Condition)
-
Condition Type: Item = Value
-
Item:
P1_ACCEPT_TERMS -
Value:
Y(assuming the checkbox returns ‘Y’ when checked)
This means: If P1_ACCEPT_TERMS equals Y, then enable P1_SUBMIT_BUTTON.
7. Add a False Action (Optional)
If you want to disable the control when the condition is not met:
-
Click Add False Action
-
Action: Disable
-
Item(s): Select the same item to disable (e.g.,
P1_SUBMIT_BUTTON)
8. Save and Run
Save your changes and run the page to test the behavior. When the user checks the box, the button becomes enabled. When the box is unchecked, the button is disabled.
Example Use Cases
-
Enable address fields only when a checkbox "Different Shipping Address" is checked.
-
Disable the "Submit" button until all required select lists are populated.
-
Enable a comments box only when "Add Note" radio button is selected.
This technique helps enforce business rules at the UI level and improves the user experience by dynamically adapting the form based on user input. It also prevents users from submitting incomplete or invalid data.
Enabling & Disabling Controls Based on Other Controls in Oracle APEX
In Oracle APEX, you can dynamically enable or disable form elements such as text boxes based on user interactions with buttons or dropdown lists. This improves user experience by preventing unnecessary input and ensuring only relevant fields are editable.
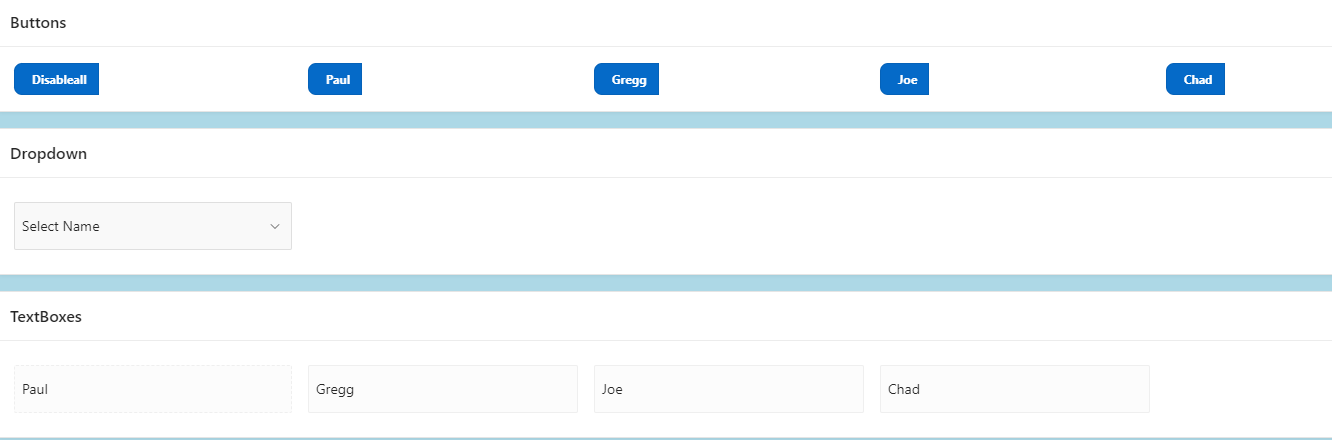
This tutorial demonstrates how to create a page with three regions: Buttons, Dropdown List, and Textboxes. The goal is to enable or disable textboxes dynamically based on button clicks or dropdown selections.
There are several ways to approach this challenge. Her is one way:
Step 1: Creating the Page with Three Regions
1. Buttons Region
Create a new Region and add the following five buttons:
Disable All
Paul
Gregg
Joe
Chad
Each button will control the corresponding text box in the Text Box Region.
2. Dropdown Region
Add a Select List item (P1_SELECT_NAME) with a LOV (List of Values) containing the following values:
This dropdown will enable the corresponding text box when a selection is made.
3. Text Box Region
Create four text box items:
P1_PAUL_TEXT
P1_GREGG_TEXT
P1_JOE_TEXT
P1_CHAD_TEXT
By default, disable all four textboxes so they are only enabled through user interaction.
Step 2: Using Dynamic Actions to Enable/Disable Controls
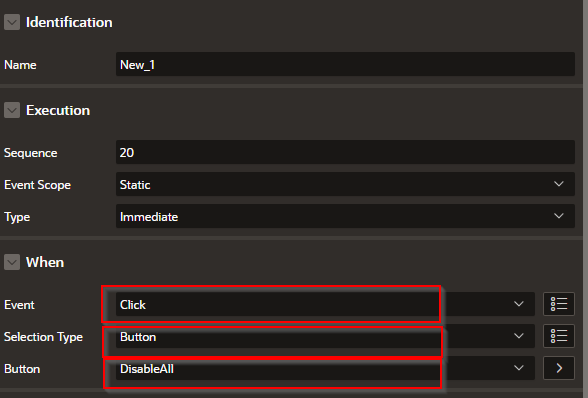
1. Disabling All Textboxes When Clicking "Disable All"
Create a Dynamic Action
Event: Click
Selection Type: Button
Button: P1_DISABLE_ALL
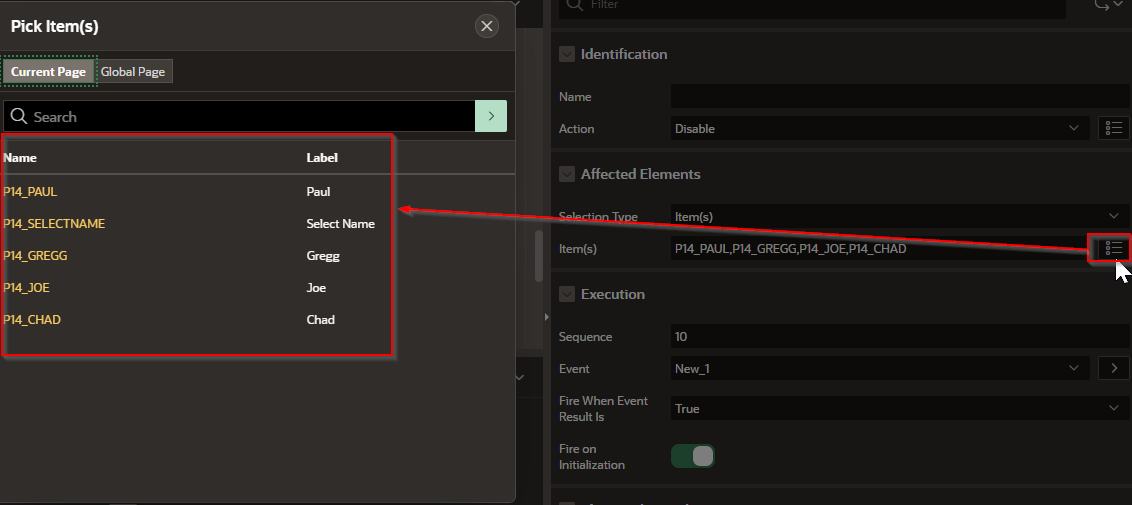
True Action: Disable
Affected Elements: P1_PAUL_TEXT, P1_GREGG_TEXT, P1_JOE_TEXT, P1_CHAD_TEXT
2. Enabling a Specific Textbox When Clicking a Button
For each button (Paul, Gregg, Joe, Chad):
Create a Dynamic Action
Event: Click
Selection Type: Button
Button: Select the corresponding button (P1_PAUL, P1_GREGG, etc.)
True Action: Enable
Affected Element: The matching text box (P1_PAUL_TEXT, P1_GREGG_TEXT, etc.)
3. Enabling a Textbox Based on Dropdown Selection
Create a Dynamic Action
Event: Change
Selection Type: Item
Item: P1_SELECT_NAME
True Action: Enable
JavaScript Expression:
switch ($v('P1_SELECT_NAME')) {
case 'PAUL': return $('#P1_PAUL_TEXT');
case 'GREGG': return $('#P1_GREGG_TEXT');
case 'JOE': return $('#P1_JOE_TEXT');
case 'CHAD': return $('#P1_CHAD_TEXT');
}
False Action: Disable All Other Textboxes
Affected Elements: P1_PAUL_TEXT, P1_GREGG_TEXT, P1_JOE_TEXT, P1_CHAD_TEXT
Step 3: Using JavaScript to Control Enable/Disable Actions
If you prefer a JavaScript-only solution, add this code in the Execute When Page Loads section:
function enableTextbox(name) {
$('#P1_PAUL_TEXT, #P1_GREGG_TEXT, #P1_JOE_TEXT, #P1_CHAD_TEXT').prop('disabled', true);
$('#P1_' + name + '_TEXT').prop('disabled', false);
}
$('#P1_DISABLE_ALL').click(function() {
$('#P1_PAUL_TEXT, #P1_GREGG_TEXT, #P1_JOE_TEXT, #P1_CHAD_TEXT').prop('disabled', true);
});
$('#P1_PAUL').click(function() { enableTextbox('PAUL'); });
$('#P1_GREGG').click(function() { enableTextbox('GREGG'); });
$('#P1_JOE').click(function() { enableTextbox('JOE'); });
$('#P1_CHAD').click(function() { enableTextbox('CHAD'); });
$('#P1_SELECT_NAME').change(function() {
enableTextbox($(this).val());
});
This JavaScript function ensures that selecting a dropdown value or clicking a button will only enable the corresponding text box while disabling the others.
Best Practices
Use Dynamic Actions for low-code, APEX-native solutions.
Use JavaScript for more control and better performance.
Ensure default states for the textboxes by disabling them when the page loads.
Optimize UI by using styling to indicate when a field is enabled or disabled.
By following this guide, you can dynamically enable and disable form fields based on button clicks or dropdown selections in Oracle APEX. This enhances user experience by ensuring only relevant fields are editable at any given time.
EXAMPLE:
Here is a second way of fixing this challenge:
Intro: We’re working with a page that
Has 3 regions
Buttons
Dropdown
Textboxes
Button regions
Has 5 buttons
Disable all
Paul
Gregg
Joe
Chad
The disable all button will disable all Text Boxes in the third region
All other buttons will ENABLE the text box associated with the same button name
Dropdown region
Has a Select List
The list is attached to an LOV with all four names (Paul, Gregg, Joe, Chad)
When a name is selected, the textbox matching the name will be ENABLED
Text Box region
Has 4 textboxes
Each text box is associated with a developer name
Step 1 – Add the 3 regions and name them accordingly
Step 2 – Add 5 buttons in the Button region and name them
Disable all
Paul
Gregg
Joe
Chad
Step 3 – Create an LOV with the 4 names in the Shared Component section of the App
Step 4- Place a Select List in the region and connect it to the lov just created
Step 5- Create the 4 textboxes and name them after the developers
Step 6- In the Disable All button,
create a Dynamic Action
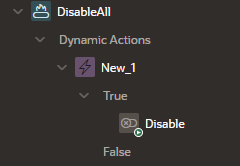
Enter the following values
In the True action make the following choices
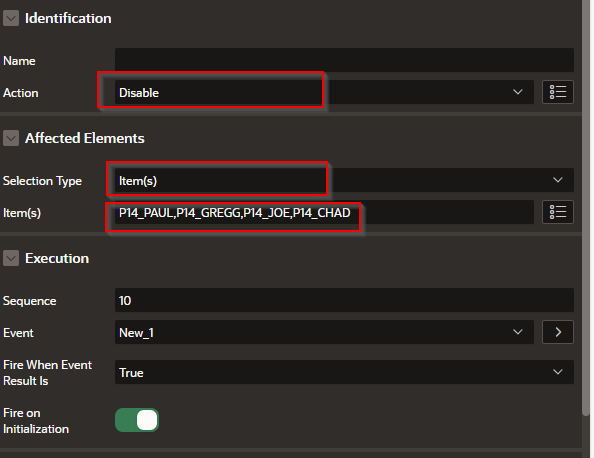
Now every time that the button is clicked ALL the textboxes will become DISABLED
Step 7 – Do the following for ALL the rest of the buttons, just change the name to reflect the developer.
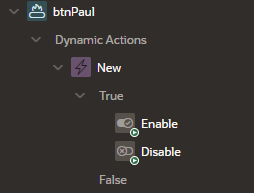
For the rest of the buttons you will create a Dynamic Action with TWO TRUE action branches
One true branch will Enable the textbox for the selected name
The second true branch will disable all other textboxes
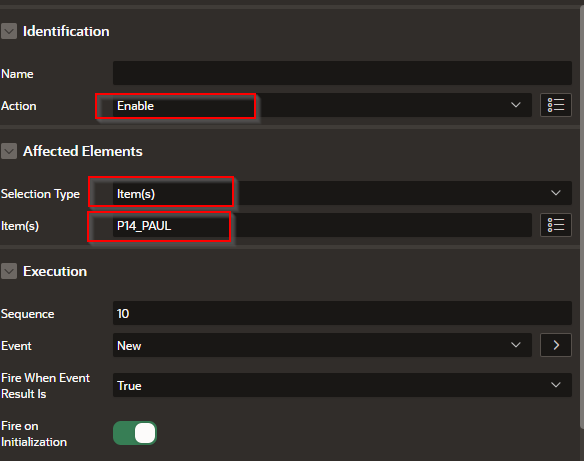
In the enable true branch do the following. In this case P14_PAUL happens to the item name for the “Paul” textbox (P14 is the page number)
In the second TRUE branch we are going to disable all text boxes EXCEPT P14_PAUL
Enter the following
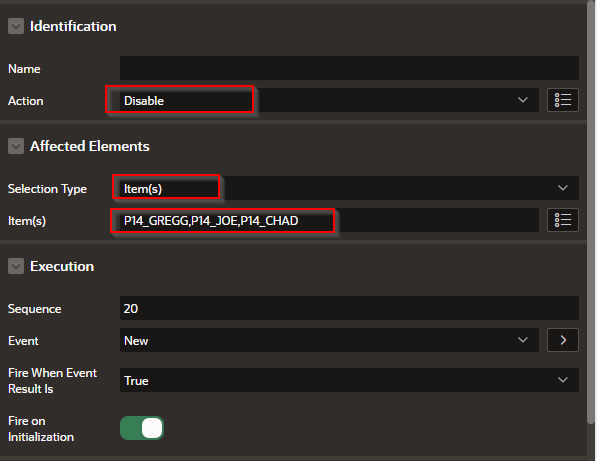
Now repeat for all of the other buttons, making the reasonable changes based on the developer name. Every time that you press a button of one of the developers, the textbox that matches the name will become enabled.
Step 8 - Add a Dynamic Action for the Drop Down list as follows
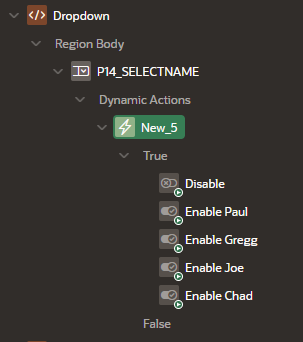
Note that her we will have one disable TRUE action that will disable all text boxes and four other actions that will enable based on the selected name from the list.
Create the Disable All list as follows:
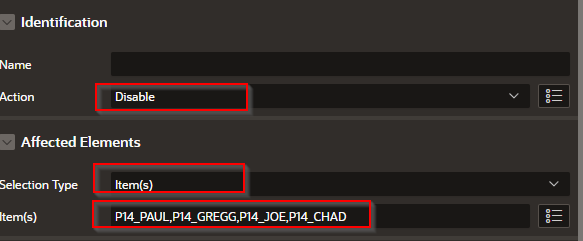
Create 4 more True actions that ENABLE the textbox based on the selected name.
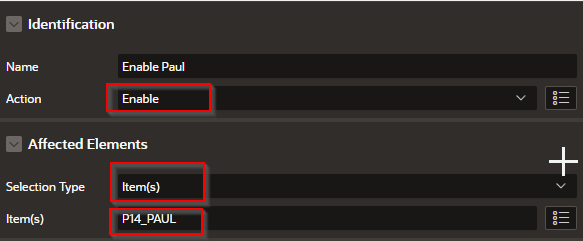
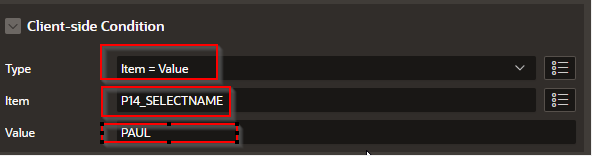
In this last Client-side Condition
We want the selected item (the dropdown selection: P14_SELECTNAME) to match on the desired value (Paul).
If this matches, then the Affected Elements in the above section (TextBox: P14_Paul) will be ENABLED as per the selected Action in Identification.
In other words, if the name selected from the dropdown box matches the string you have in the “Value” area then the textbox for Paul will be enabled.
Controlling the interactivity of controls based on other inputs is a powerful technique that helps streamline data entry and improve validation in Oracle APEX forms. Whether you're working with checkboxes, select lists, or radio buttons, the ability to enable or disable related controls dynamically ensures a more user-friendly and efficient interface. This not only improves the accuracy of the collected data but also delivers a modern, interactive experience expected from today's web applications.


