Introduction
Checkbox lists are a powerful feature in Oracle APEX reports that allow users to select multiple rows for actions like batch processing, approval, or deletion. By integrating checkbox lists into your Interactive or Classic Reports, you can enhance user interactivity and streamline workflows that require multi-record input. This blog post explains how to add checkbox lists to a report, manage the selected values, and trigger server-side processes based on user selections.
How Do I Add Checkbox Lists in a Report in Oracle APEX
Purpose
Checkbox lists in Oracle APEX reports allow users to select multiple rows of data for batch actions like updates, deletions, or approvals. This is useful in admin dashboards, workflow management, or any screen where multi-row interaction is required.
Step-by-Step Guide: Adding Checkbox Lists to an Interactive Report
Step 1: Create an Interactive Report Page
Start by creating a new Interactive Report page or use an existing one. The report should display the data you want users to select from.
Step 2: Add a Checkbox Column to the Report
Go to Page Designer, select the report region, and add a new column to represent the checkbox. For example, you might use a hidden primary key column like EMPLOYEE_ID.
Click on the column → Under "Appearance" set the column type to "Plain Text" → Under "HTML Expression", enter the following:
<input type="checkbox" name="f01" value="#EMPLOYEE_ID#">
This creates a checkbox for each row, assigning the EMPLOYEE_ID as the value.
Step 3: Add a Button to Submit Selection
Create a button (e.g., "Submit Selected") on the same page. Set the button action to "Submit Page".
Step 4: Create a Process to Handle Selected Values
In Page Designer, under Processing, create a new PL/SQL Process that runs when the page is submitted. Use the following example code:
FOR i IN 1 .. APEX_APPLICATION.G_F01.COUNT LOOP
  -- You can use APEX_APPLICATION.G_F01(i) to access each selected value
  UPDATE employees
  SET status = 'Approved'
  WHERE employee_id = APEX_APPLICATION.G_F01(i);
END LOOP;
This code loops through the selected EMPLOYEE_IDs and applies an action to each one.
Step 5: Optional - Display a Confirmation or Success Message
Add a Success Message in the process or under "Messages" to confirm the update has occurred.
Step 6: Test the Page
Run the page. Select multiple checkboxes, click the submit button, and verify that the selected rows were processed accordingly.
Notes and Best Practices
The checkbox input name should be "f01", "f02", etc., and must match the G_F01 reference in the process.
Use unique identifiers (like primary keys) as checkbox values.
Always validate and sanitize inputs in backend processes.
Use hidden columns if needed to avoid exposing sensitive IDs in the visible report.
Add JavaScript or Dynamic Actions if you need more control over selection behavior.
Summary
Adding checkbox lists to an APEX report allows multi-row user interaction, improving the flexibility and efficiency of your application. By using HTML expressions and APEX_APPLICATION collections, you can easily manage selected rows and execute bulk operations with minimal code.
Conclusion
Incorporating checkbox lists into your Oracle APEX reports improves usability by enabling users to interact with multiple records efficiently. Whether used for mass updates, approvals, or data tagging, checkbox functionality can significantly boost productivity in your applications. With the right setup, checkbox lists provide both flexibility and control, helping you build responsive, user-centered solutions.
Example
Step 1 - Add a region
Step 2 – Add a region Item
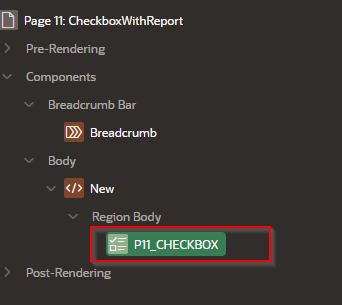
Give it a name and make it a checkboxgroup

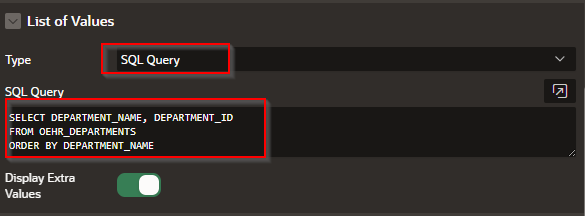
In the List Of Value area
Select Type: SQL Query
In the SQL Query field select a select query
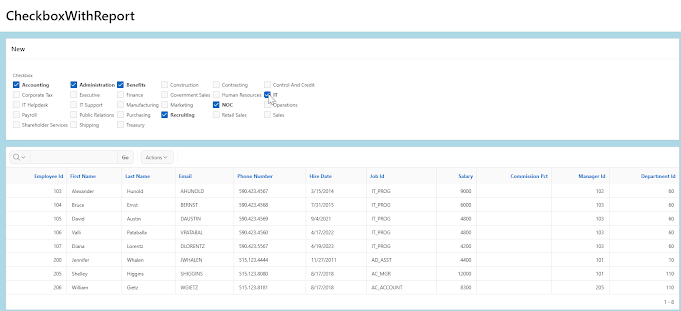
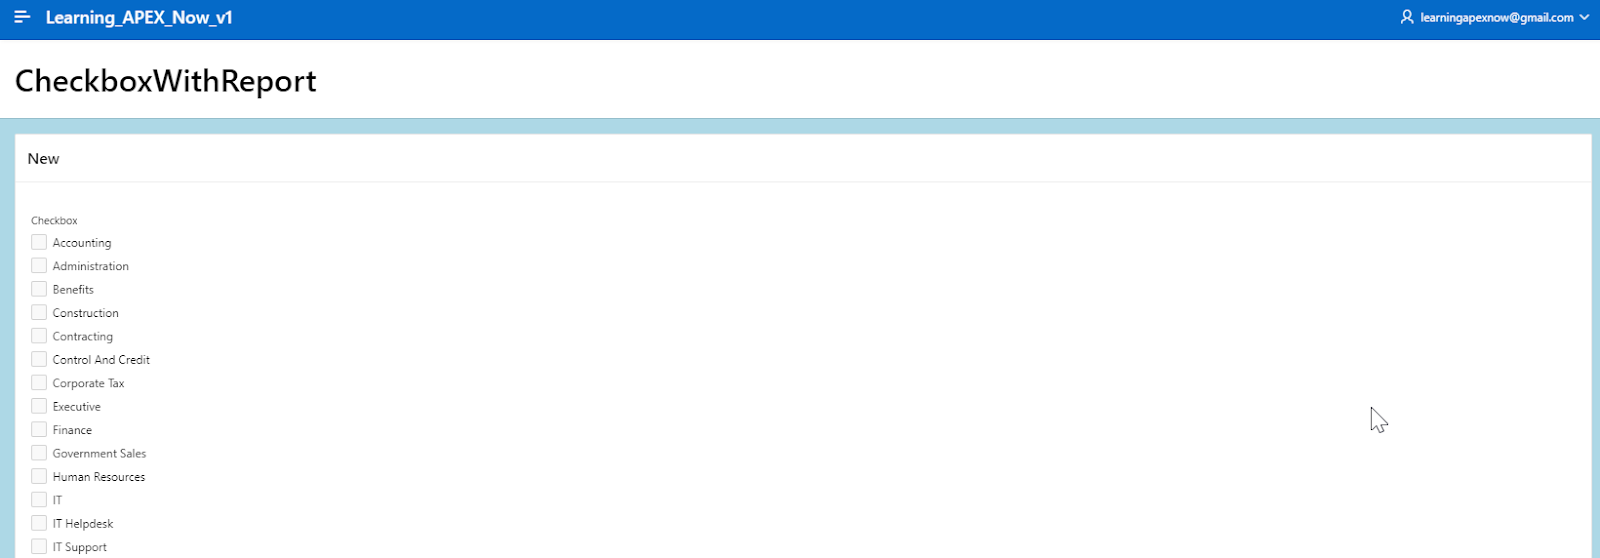
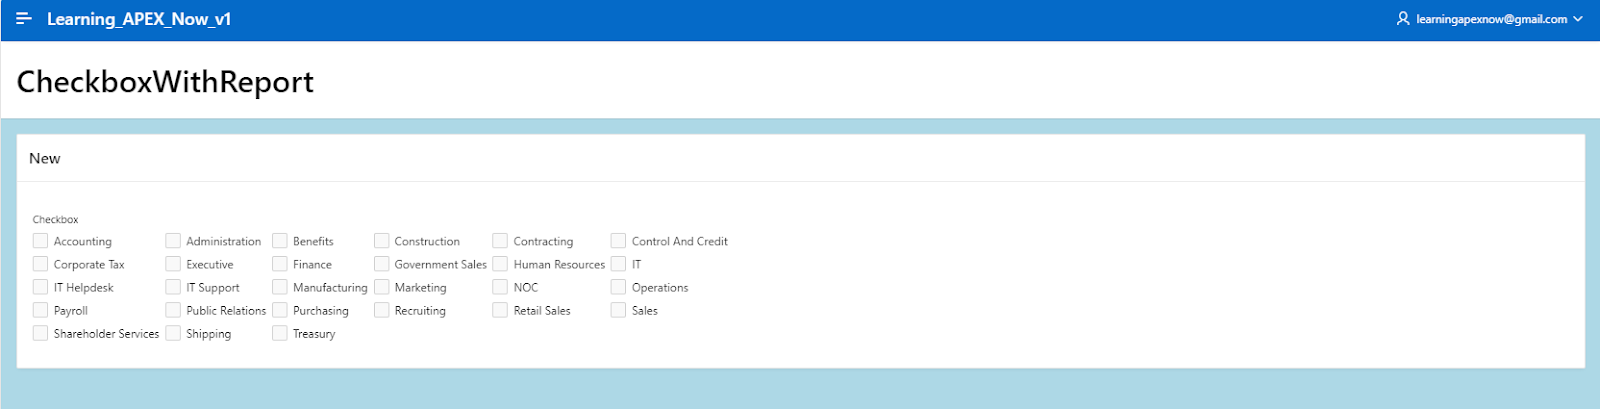
Step 3- review your page, it should look something like the following example
Step 4- make the checkboxes be grouped into manageable columns. Here we are using the number 6.
Settings > Number of columns: 6

Here is what it looks like with the change:
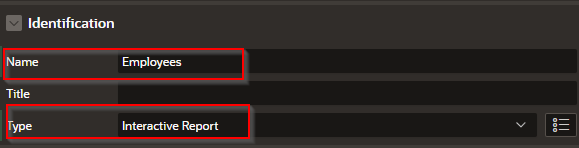
Step 5 – Create a new Region
Identification > Name: Employees
Identification > Type: Interactive Report
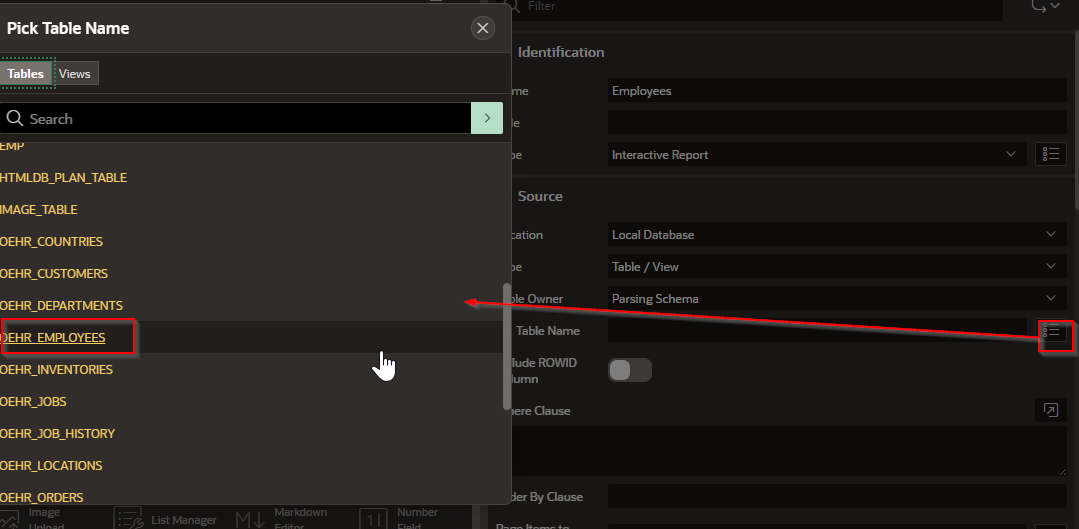
Source > Table > OEHR_EMPLOYEES
Source > Where Clause:*Notice that there is no need for the word “WHERE’*
InStr(':' || :P22_DEPARTMENTS || ':', ':' || DEPARTMENT_ID || ':' ) > 0
AND DEPARTMENT
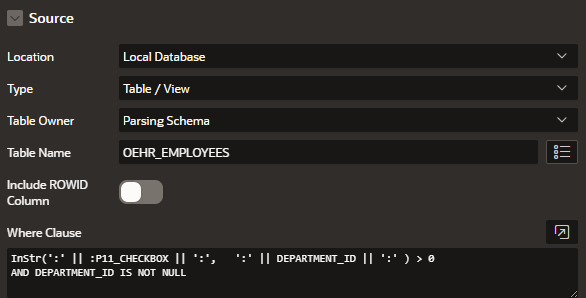
Source > Page items To Submit – Place the name of the checkbox

Step 6- Create a Dynamic Action for the checkbox group\
In the true section
Identification > Action: Refresh
Affected Elements > Section Type: Region
Affected Elements > Region: Employees

The final product should look something like this