Using Dropdown Boxes in Oracle APEX
Dropdown boxes, also known as select lists, are a fundamental UI component in Oracle APEX. They allow users to select a value from a predefined list, making data entry more efficient and standardized. APEX provides various ways to populate dropdowns, including static values, SQL queries, and shared components such as LOVs (List of Values).
Creating a Dropdown Box in Oracle APEX
To create a dropdown box in Oracle APEX, follow these steps:
Open your APEX application and navigate to the desired page.
Click Create and select Item.
Choose Select List as the item type.
Specify a name for the dropdown item (e.g., P1_CATEGORY).
Under List of Values, define how the dropdown will be populated.
Save the changes and run the page to test the dropdown.
Populating a Dropdown Box
There are three primary methods to populate a dropdown in APEX:
1. Using Static Values
A static list is useful when you have a small, fixed set of options. In the List of Values section, select Static Values and enter values manually. Example:
Display Value 1 | RETURN_VALUE_1
Display Value 2 | RETURN_VALUE_2
Display Value 3 | RETURN_VALUE_3
The Display Value is what users see in the dropdown.
The Return Value is what is stored in the database when a user makes a selection.
2. Using a SQL Query
If dropdown values need to be dynamic, use a SQL query. For example, to fetch product categories from a table:
SELECT category_name, category_id
FROM product_categories
ORDER BY category_name;
The first column (category_name) is the display value.
The second column (category_id) is the return value.
The ORDER BY clause ensures the list is sorted.
3. Using a Shared List of Values (LOV)
APEX allows you to create reusable lists of values.
Go to Shared Components > List of Values.
Click Create and define the LOV with either static values or a SQL query.
In the dropdown item settings, select Use Existing Shared List of Values and choose the LOV.
Dropdown Box Attributes
Dropdowns in APEX come with various attributes that control their behavior and appearance:
Display Null Value: Adds an empty option at the top, allowing users to select no value.
Cascading LOV: Filters the dropdown based on another item’s value. For example, a "Subcategory" dropdown can be filtered based on the "Category" selection.
Default Value: Specifies a pre-selected value when the page loads.
Allow Multi-Selection: Enables users to select multiple values, useful when using checkboxes.
Appearance: Controls styling, such as button-based dropdowns or custom CSS.
Cascading Dropdowns (Dependent Lists)
A cascading dropdown dynamically updates its values based on the selection in another dropdown.
Example: Category and Subcategory Dropdowns
Create a Category dropdown (P1_CATEGORY) with the following SQL query:
SELECT category_name, category_id
FROM product_categories
ORDER BY category_name;
Create a Subcategory dropdown (P1_SUBCATEGORY) with this query:
SELECT subcategory_name, subcategory_id
FROM product_subcategories
WHERE category_id = :P1_CATEGORY
ORDER BY subcategory_name;
Under the Subcategory dropdown settings, set Cascading List of Values to P1_CATEGORY.
When a user selects a category, the subcategories will automatically update based on the chosen category.
Populating a Dropdown via AJAX
If you need to update dropdown values dynamically without a full page refresh, use AJAX in a dynamic action.
Example: Updating a Dropdown with JavaScript
apex.server.process(
"GET_SUBCATEGORIES",
{ x01: $v("P1_CATEGORY") },
{
success: function(data) {
var items = JSON.parse(data);
apex.item("P1_SUBCATEGORY").setChoices(items);
}
}
);
This calls a PL/SQL process named "GET_SUBCATEGORIES".
The selected category (P1_CATEGORY) is passed as x01.
The response is used to populate the subcategory dropdown dynamically.
On the APEX server-side, the corresponding PL/SQL process might look like this:
DECLARE
l_json CLOB;
BEGIN
SELECT json_arrayagg(json_object('d' VALUE subcategory_name, 'r' VALUE subcategory_id))
INTO l_json
FROM product_subcategories
WHERE category_id = apex_application.g_x01;
sys.htp.p(l_json);
END;
This process returns a JSON array of subcategories, which JavaScript uses to update the dropdown.
Customizing Dropdowns with CSS and JavaScript
Styling Dropdowns with CSS
You can modify the appearance of dropdowns using CSS. Example:
select {
background-color: #f8f9fa;
border: 1px solid #ccc;
border-radius: 4px;
padding: 5px;
}
This styles all <select> elements in the application.
Enhancing Dropdowns with JavaScript
To automatically select a default value based on user actions, use JavaScript:
$("#P1_CATEGORY").change(function() {
if ($(this).val() === "Electronics") {
$s("P1_SUBCATEGORY", "Laptops");
}
});
This sets the subcategory to "Laptops" if "Electronics" is selected.
Best Use Cases for Dropdowns
Dropdowns are ideal for scenarios where users need to select a value from a predefined list. Some common use cases include:
Forms: Selecting countries, departments, or product categories.
Filtering Data: Refining report results based on dropdown selections.
Navigation: Switching between different views or modules.
Cascading Selections: Updating one dropdown based on another.
Dropdown boxes in APEX provide a powerful way to enhance user interaction and streamline data input. By leveraging static values, SQL queries, and AJAX-based updates, you can create flexible and efficient dropdowns. Additional customization with CSS and JavaScript further improves usability, making dropdowns an essential component in any APEX application.
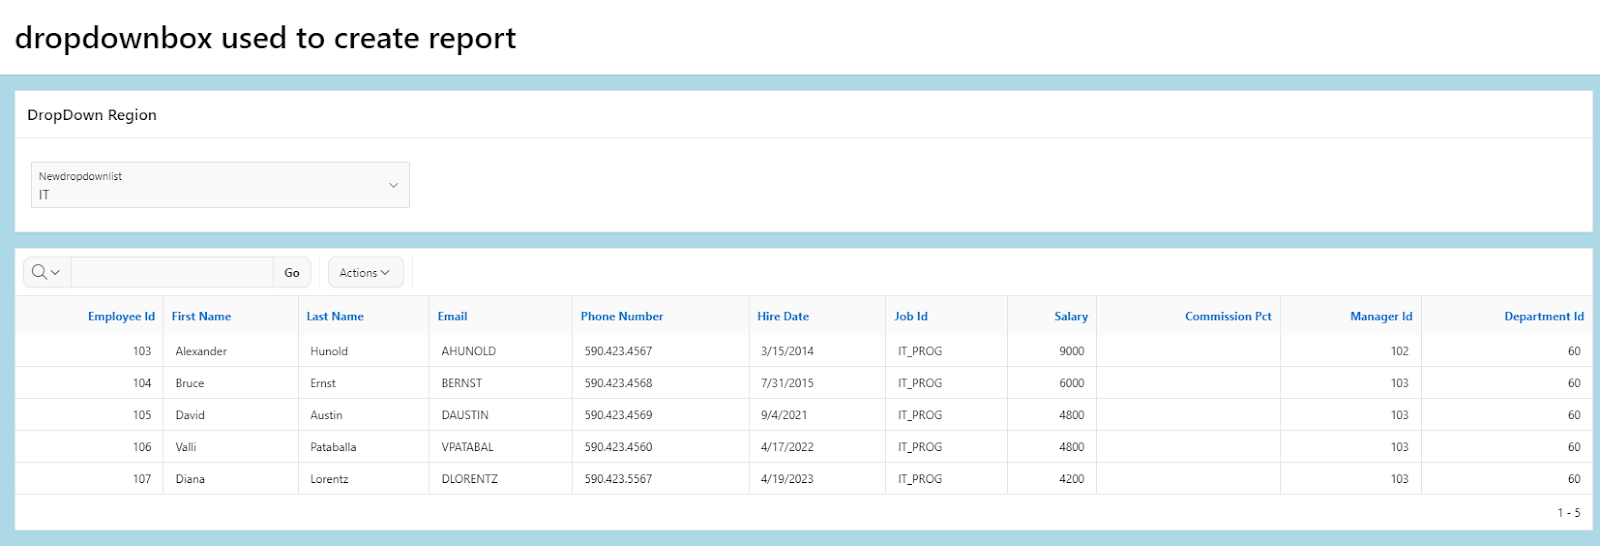
EXAMPLE:
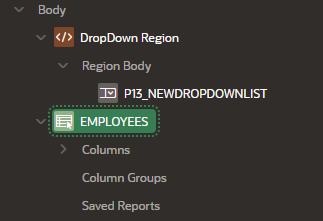
Step 1: Create a region
Identification > Name: DropDown region

Step 2: Create a page item
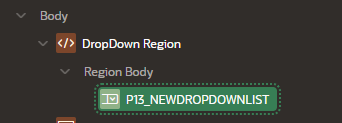
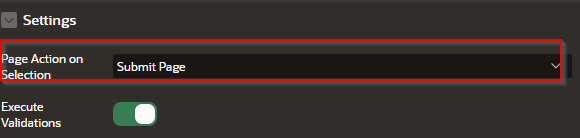
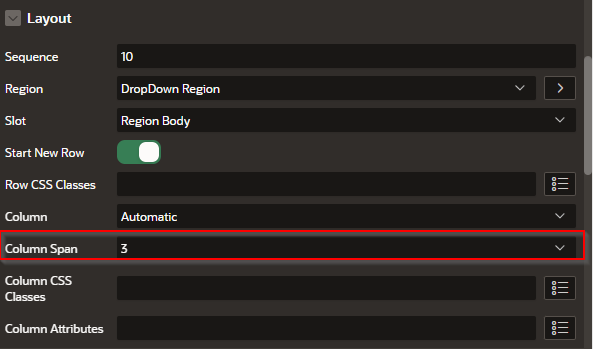
Step 3: Set the following in the page item
Identification > Type: Select list
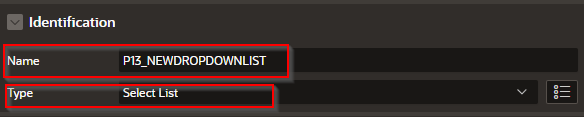
Label > Label: NewdropdownList

Settings > Page Action on Selection > Submit Page
Layout > Column Span: 3
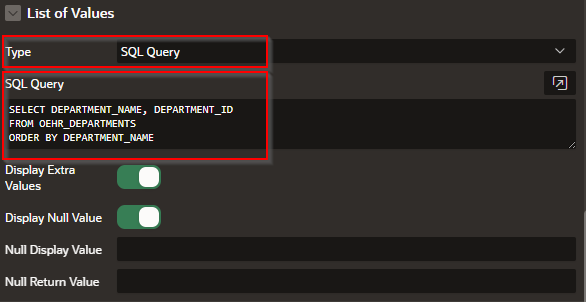
List of Values > Type: SQL Query
List of Values > SQL Query:
SELECT DEPARTMENT_NAME, DEPARTMENT_ID
FROM OEHR_DEPARTMENTS
ORDER BY DEPARTMENT_NAME
Step 4: Add an Interactive Report
Add a region
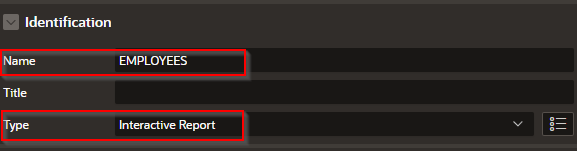
Identification > Name: EMPLOYEES
Identification > Type: Interactive Report
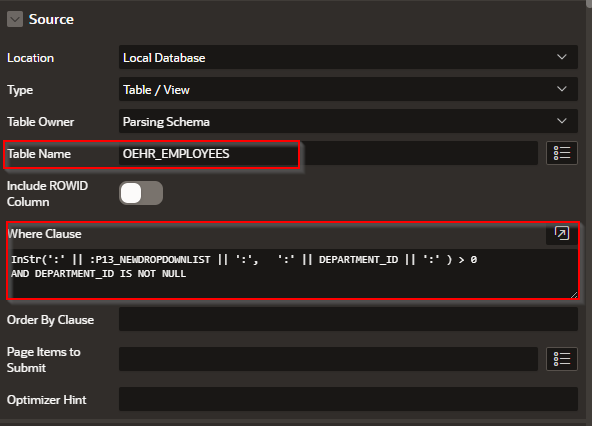
Source > Table Name: OEHR_EMPLOYEES
Source > Where Clause:
InStr(':' || : P13_NEWDROPDOWNLIST || ':', ':' || DEPARTMENT_ID || ':' ) > 0
AND DEPARTMENT_ID IS NOT NULL
Result should look something like this


No comments:
Post a Comment